Tag Archives: fail

Girl On Fire T-Shirts

Standard

Oy. Let’s just start off by acknowledging the fact that I am no good at this blogging thing. For a while there in the last couple of months, I considered just quitting altogether, but I’ve decided to buck up and continue to post stuff every now and then. So you’re stuck with me.

Today’s post is brought to you by this lovely pin. In our church, every summer we have what we call “Girls Camp” for our “Young Women” ages 12-18. Oh how I love Girls Camp! This year, I am lucky enough to be in charge of camp for the small group of  young women in our congregation (ward). The theme the girls decided on was “Girl on Fire” from The Hunger Games. (We’re emphasizing being on fire with the spirit rather than kids being forced to kill each other, by the way.)

In my search for ideas, I came across a great blog post from Better Than We Deserve from when they did the same theme. One of my favorite things they did was their bleached out t-shirts:


After showing them to the girls, they decided they wanted to do the same thing, so I ordered a bunch of black t-shirts and when they came, I set about to do a test one, with all of the bleaching-a-design-on-a-t-shirt knowledge I had gleaned from the internets.

100_0842


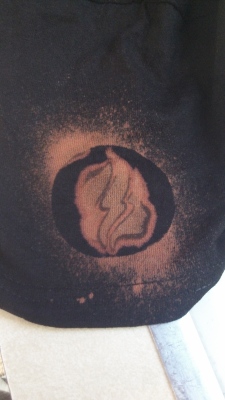
That was my SECOND try. (I didn’t even bother with pictures from the first one.) Not exactly what I was going for. So let’s just recap my failures here for moment, shall we.

Attempt numero uno: I used my trusty Silhouette Portrait to cut the stencils out of heavy card stock, and then used a spray adhesive to stick it onto the shirt and sprayed with a 50/50ish bleach/water solution. So much bleeding, you couldn’t even tell what the symbol was. At this point, I was kind of freaking out because we were supposed to do the shirts the next night, so I made a mad dash to Facebook (of course) and pleaded for all craft experts everywhere to help me.

Attempt numero dos: With some advice from friends, including the queen of freezer paper bleaching herself, I set out with confidence to try again. This time I cut some stencils out of freezer paper, ironed it onto the shirt, and sprayed straight bleach onto the shirt. Still bled like crazy (see above), but at least you could tell what the shape was, right? But the places where the bleach looks the strongest – yeah, there’s not supposed to be any bleach there.

We did something else with the girls that night and saved the shirts for later.

Attempt numero tres: I just didn’t get it, I seemed to be doing the same thing as I watched work in soooooo many videos and tutorials, and yet, crisp lines were out of my reach. But fear not, success is on the horizon. For my third attempt, I cut stencils out of transparencies, so the bleach couldn’t soak through the paper (even though it shouldn’t have with the freezer paper). I also found a spray bottle that had a more “misty” spray than the one I had been using. I used an only slightly diluted bleach solution, probably 2 or 3 parts bleach to 1 part water (I didn’t measure, just eyeballed it). I decided to forgo the spray adhesive and see what happened. And it worked!

Key things: Use a piece of cardboard in between layers of your shirt so the bleach doesn’t soak through to the other side. Make sure your spray is as misty as possible and DON’T OVERDO IT. I think this was one of my main problems the first couple of tries – I just sprayed waaaaay too much and soaked the shirt, so easy does it. You’ll start to see the bleach working in about 30 seconds or so. When your bleaching looks like you want it to, rinse that baby out right away and then wash it (on its own or with other things you’ve bleached), then dry it in the dryer and voila! Loveliness.

So last night, we finally had the girls do their shirts and I just love them. When I first started testing the bleach, I was disappointed that it didn’t make the shirts go white, like in the inspiration pictures. But, with the reddish/orangish/brownish hue that it DID turn, the shirts go well with the theme of being on fire, so I’ve changed my tune.

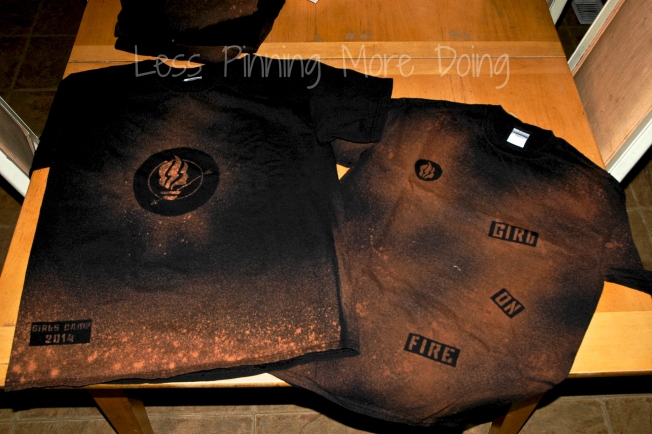
Here are a couple of the girls’ shirts:

GirlOnFireShirt1


I especially love how this one looks like it has smoldering embers across the bottom:

GirlOnFireShirt2

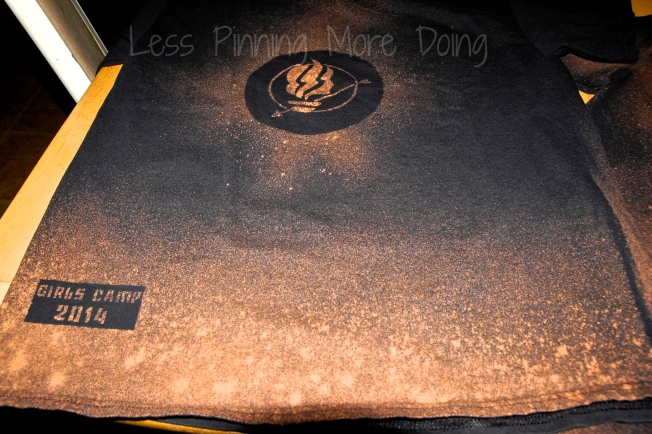
Here’s an up close view of the great logo one of our girls designed for us, combining the Young Women’s torch with the symbol of the mocking jay from the books:

GirlOnFireShirt3


I love that each of the girls have a unique shirt of their own design, but that there is also a unity between them through the colors and the stencils. We had a lot of fun making them!

We have some other fun things planned for camp, so once it’s over and done with, maybe I’ll share a post about what we did. If you’re lucky.

Do you have any tips for designing with bleach? Share with us in the comments!


How Not to Give Your Kids a Trip to Disneyland

Standard

Let’s just ignore the fact that it’s been nearly 2 months since I last posted and carry on as though I never left, shall we? Okay then.

For Christmas this year, Mr. LPMD and I decided to surprise our kids with a trip to Disneyland. Not a trip during the Christmas break, but for a bit later in the year, thus we needed to come up with a fun way to let them know what their gift was. (Seeing as how we live on a budget and it would therefore be replacing the majority of what they usually get for Christmas.) Enter brilliant idea numero uno: a treasure hunt.

I grew up with treasure hunts. Like, my mother is the QUEEN of treasure hunt creation. Thus it seemed only fitting to channel my inner mother and do the same, right? Part of the treasure hunt creation curse is that it MUST rhyme. Must. I blame my mother. Again. So here are the clues I came up with. (I changed the number of days because, as much as I love all of you lovely readers, I’d rather not publicly advertise when we’ll be away from home, thanks.)

Merry Christmas to you, and all of the Rays!
We have a big present
It’s really quite pleasant
But you don’t get to have it for 42 days!

I know that’s a long time, but never you fear
To find out what you get,
Don’t cry and don’t fret,
Just follow the clues that you find far and near.

CLUE #1
Look for the girl with the crazy red hairs.
I’ve heard she’s quite Brave – she might be downstairs!
{Their clue was accompanied by a new DVD of Brave}

CLUE #2
To find the next clue, you must work together,
And search the back porch, no matter the weather.
Might be buried in snow, might be stuck in a crack,
But I’ll give you a hint – the next one is black!
{Nothing fancy – just glued the clue to a black piece of construction paper}

CLUE #3
You found it! Great job! Now back inside fast,
You must put on your coats and your gloves and your hats,
And then put on your boots the last thing of all
To find your next clue (which is pretty dang small).
{Clue was hiding inside of one of the boots}

CLUE #4
Now that you’re suited and ready to go,
Walk two houses south to somebody you know.
Sing a carol or two when they come to the door,
But you have to sing loud, to get what you came for!
{I had previously delivered the next clue to this neighbor, so she could give it to them after they sang}

CLUE #5
Home again, home again, jiggity jig,
Look for the next clue with Ralph, who is big!
You’ll have to look in your bedrooms to find him
The clue that you seek will be hiding behind him.
{Clue hiding with new Wreck It Ralph DVD}

CLUE #6
Don’t you love spending Christmas with family all day?
At the hospital, people are working away!
Let’s take them some cookies and spread Christmas cheer
To brighten their day and wish Happy New Year!
{I had the next clue in the car and gave it to them after we delivered the cookies}

CLUE #7
Now head to Park City, to see Grandma and Grandpa
Tell them about all your good things from Santa!
Then look for your clue that is hiding with Hugo,
When up, up, and up to the Lego Loft you go.
{The “Lego Loft” is what our family affectionately calls the attic-level playroom at Grandma’s house and the clue was accompanied by a new HUGO DVD}

CLUE #8
This is your last clue, so listen up good!
Stay close together, as good siblings should!
If you were a present, then where would you be?
Perhaps it’s not hiding, but _______  ____  _______!

YOU FOUND IT! HOORAY!
WHAT A WONDERFUL DAY!
Now all together you can open the box,
But first let me tell you, this gift totally rocks!


Now…what would they find at the end of the hunt? Cue brilliant idea #2: A box, full of stuff to do in the car on the long drive to the park and a cute Mickey Mouse countdown chain and some Disney trading pins and their backpacks/lanyards from Get Away Today (where we purchased our trip) and a Disneyland guidebook and a calendar with the dates of the trip marked. Mr. LPMD contributed the idea of park maps. We gave the big wrapped box to Grandma to already have at her house when we came. It was hidden away and when the kids went upstairs to look for their clue, we pulled it out and put it front and center under the tree.

This was going to be awesome. They were going to be sooooooo excited. We tease and talk about going to Disneyland all of the time. The kids have never been there and frequently ask if we can go. We tell them that we’ll go when they can pay for it. Or when the 1 year old (who’s not a 1 year old anymore) guesses the “secret ingredient” in our dinner without any help. As in: it’s never going to happen, kiddos! So yeah, they’ll be shocked and excited. We’re going to end up with one of those home videos where the kids are told they’re going to Disneyland and they freak out they’re so freaking excited about such a freaking awesome gift. And then Disney would get ahold of the video and love it and want to use it for advertising and give us free trips to Disney parks for life. My kids would be just. like. that.

Clearly, we have some work to do in the excitement department. (And for the record, they ripped 4 links off that chain when they just tossed it aside like garbage. Punks.)

I hope you had a wonderful holiday!

The Closet Door Makeover You’ve All Been Waiting For

Standard

Remember back in the day when I redid my bedroom while my husband was out of town? Remember how my after shots were sans closet doors? Well not anymore, my lovely reader – I finally finished them! (Yes, as in, just last night. I don’t work well not under pressure, mkay?)

I give you…the makeover that took our boring bifold closet doors from

 Drab to Maybe-Not-Quite-Fab-But-Certainly-Better-Than-Before….I-Think

Just to refresh your memory, here’s a little peek at the before so you know what I was facing. (Once again, sorry for the bad lighting. As a side note, I actually figured out why I was having such bad lighting problems with my camera – the white balance had been set to fluorescent and left there. Oy vey!)

I knew I needed to do something about those doors, but I couldn’t buy new ones, so I figured I’d just paint them. In the middle of the week when I was eyeball deep in the room makeover, I asked some friends if they thought I should paint them blue to blend in with the wall they were on or grey like the accent wall to stand out more. As we were debating back and forth between those options, I found this:

And my life was forever changed. I looked at these doors and thought…I can do that! Well, not *exactly* that, but something like that!

Now, as much as I would love to, I had no intention of actually splitting the doors apart to rid them of their bifold-ness, because that would take more work than I was willing to do. But, if I could just eliminate the slats on top and repaint the doors and change out the handles and add some cute fabric, they just might look better. Plus, those are all things I can do. By myself. Booyah.

And so it began. To my delight, I was able to just pull the slats right out. We discovered this by accident when I asked Mr Crazy Lady how he though I should eliminate them and he jokingly said “Just break them,” and proceeded to punch a slat with the intent of breaking it. Instead, it bent a little and then came right out. Awesome sauce.

Next up was removing the hinges and the handles so I could paint.

I used some of the removed slats to lift the doors up off of the plastic to keep them from sticking once they were painted. I also had to do a great deal of wiping down first to get rid of dust and debris. Man, those things were dirty! Once again, the removed slats came in handy, as I wrapped my damp cloth around the end of one in order to get between the slats all cleaned up. Painting time! I think I used about 6 cans of Rustoleum spray paint. I probably should have used 7, but it was good enough for who it’s for.

I put the hinges back on those suckers and was ready to take them back inside. Once they were rehung, and had handles, it was time to add the curtains that I had so painstakingly made.

Cute handles, eh? I considered getting more crystally ones like in my inspiration photo, but alas, the husbandman was against it.

Now, let me tell you about the curtains. My original thought was that I have this really pretty silver-grey fabric that I got on clearance years ago that I love but have never had a real use for. But then I decided it would look better if the curtains in the closet doors matched the curtain at the window. The curtain at the window I had gotten on clearance at Walmart. But not the Walmart in my town – no, no, it had to be the Walmart in one town over. There had been two on clearance. I had considered buying both even though I knew I really only needed one. So I bought one. Of course, all of this was before I knew I was going to go all crazy on the closet doors. Grrrrrr. Luckily (after a power outage that had Walmart closed on my first trip) the second curtain was still there, patiently waiting for me. Booyah! Took it home. Cut it up. Made little curtains. Ka. Zam.

That’s when the trouble started. I had found some “cafe rods” that should have been perfect for these doors. But they weren’t. See, I decided not to cover up the hole from the removed slats because I figured the curtains would hide them. Unfortunately the cafe rods had little hook-things that had to be hammered into the sides. It’s hard to hammer a little nail into an empty abyss of a hole. After much hammering and denting of my new nicely painted door, I got one rod up. To my dismay, there was about a 1/2 inch gap at the top because of the space the hook needed. This was NOT going to work. I abandoned those rods and went in search of a spring tension rod that would fit in a 12.25 inch space. Have you ever done that? It’s not an easy task! I did eventually find some online, where I ended up paying twice what I paid for the curtain fabric. Dumb rods. But they finally came yesterday and it took me all of 15 minutes to put up all 4 curtains!

If you look closely, you can see that the rubber stoppers are sticking out on the bottom. When I originally sewed the curtains, I was planning on using the first rods, which would have fit perfectly into the slim casing. However, these new rods were a bit thicker and were a tight squeeze. The rubber stoppers didn’t stand a chance. (The reason this wasn’t a problem on top is because I just left the original casing from the curtain as I bought it, which was much wider.)

Maybe someday we will actually put some nice moulding around the doors, but all in all, I’d say it’s not too shabby. Certainly much better than before, don’t you think?

Four Day Master Makeover: Day 3

Standard

A busy, yet successful day. With a bit of a FAIL.

I spent the morning running errands (including dropping over $550 on new tires for my van…yeah…all of the sudden I’m thinking the husband is not going to be happy about the money spent on this makeover stuff.)

At our local thrift store, I found a FANTASTIC little table to use for my nightstand (for $8!) that will get a bit of a facelift first. Not by tomorrow night, mind you, but eventually. Actually, there are a lot of “eventually” things left to do in the room. That probably makes it not such a Four Day makeover, eh? And not that this has anything to do with the makeover, but I also found a big box of wood building blocks for the kids for 5 buckaroos. Seriously – this thing was HEAVY. How could I pass up a deal like that with 4 munchkins in the house?

Moved the mattress and box springs back into the room after some much needed vacuuming. Checked on the bedding and it’ll be here tomorrow! Yay! And I got the laundry sorters all painted, inside and out. Since the insides are blue and I decided to use spray paint for that part, I ended up looking a bit like I belonged in Kentucky with these guys:

But never fear, a shower and much scrubbing has returned me to my normal state.

Aaaaaaand onto the FAIL. As I mentioned last night, I was planning on using this photo transfer to canvas method. I have 4 photos that I wanted up on the wall and I thought this would be a great way to display them. Unfortunately, I can’t find my cord to upload the photos I took, but I’ll tell you all about my failure that has me back to square one for some wall decor. :P And when I find the cord under all my mess I’ll add photos.

I decided to try the Mod Podge and Elmer’s Glue method she mentions at the very end of her post. I had the UPS Store print my pictures because I don’t have a laser printer. Unfortunately they printed them on very nice paper. I guess the lower the paper quality, the better this method works. But I digress.

I prepped the canvases with the glue. I was so excited to sit down and do this (maybe I was just excited to sit down?). And then…I sucked at it. My first photo was practically unrecognizable. Word to the wise: If you’re planning on doing a photo transfer like this, use a picture you don’t care about for the first one. My second one looked a bit better. Not great, mind you, but better. My third was looking dang good. I started to think of tips I could post like:

More Mod Podge is better than less. But not so much you’re oozing out the sides in great gobs of Mod Podge gooeyness.
And: Wetter is better. All this “dampen the paper” stuff is garbage. You want that paper wet. Soaked through. And when it’s getting even just a little difficult, spray the area some more and then go work on another area that is very very wet and has had a bit of time to soak. And then when that gets a little resistant, spray it and go back to the first area.
And: Don’t rub too hard. Yes, all of the tutorials out there say this, but seriously…DON’T rub too hard.

All great tips. But then I looked at the dried products. I could hardly see the pictures through the ghostly white residue left behind. I even took a damp soft cloth and tried to rub (gently) the film away and it looked great when it was wet, but when it dried…BAM! White residue. Sprayed the dang thing with water and wiped (a little less gently) with the soft cloth again. Still white residue.  I’m tempted to brush some Mod Podge over the top of one just to see if that residue will disappear when that happens, but if I do, it won’t be until tomorrow…when I have nothing else to do. #eyeroll